The Mazda add-on CD was out, since I do not want to flip CDs while driving. Also, either you have to put the CDs in the trunk each time you leave the car, or provide another target for thieves. Any thief with a pocket knife could slash through your $1000 top in search of your $10 CDs, even if you were conscientious enough to put them in the trunk.
So I decided on a trunk-mounted Sony CDX 505RF 10-disk CD changer. This changer comes with a RF modulator, which converts the CD output to a radio signal that can be spliced into the antenna signal of the factory radio. Unfortunately, that way you lose the dynamic range of the CD player, and there may also be interference with true antenna signals.
It is better to take the RCA line outputs of the CD (a white and a red plug) and feed them directly into the amplifier part of the factory radio. This can be done by soldering your own connections; you can find Adam Seligman's instructions on miata.net. Please see there for the basic procedure. Adam Seligman's procedure includes a switch that selects between radio and CD changer (RCA) output. I will restrict myself to information not given by Adam Seligman and to difficulties I encountered.
To route the required cables from the radio to the CD changer in the trunk, I routed these cables below the plastic console between the seats toward the rear of the car and then used the driver's side tunnel towards the trunk.
To do so, in the car I first took out the console between the seats: put in neutral with the brake on, screw off the shift knob, then take out five philips screws (two in the armrest storage compartment, one below the ashtray, and two at the sides at the front end). You can now lift the console a bit at the front end and work the rear free from the gas and trunk release switches. I put the console away on the passenger seat.
Next I made an opening to the trunk. First I took off the plastic buttons holding the carpet on the rear wall behind the seats: five on the carpet covering the top of the "deck", followed by four on the carpet covering the wall. To get the buttons off, I slid a removal tool below them and simply pulled them off. The removal tool looks roughly like a split flat screw driver: the stem of the button goes in between the split ends and the ends then pull it off. I got the removal tool at Wallmart. Next I took off four 10 mm bolts on the wall that hold the metal cover plate tight. I could now slide the cables below this cover towards the trunk space.
At the other end, in the trunk, I first took the piece of carpet off where the jack handle is attached. The carpet is held by three plastic buttons: lift up their center with a thin screwdriver and they come out easily. Then I took off the metal plate closing off the tunnel: four 10 mm bolts. The fuel refiller pipes are now visible.
From there, I managed to pick up one of the cables from the car by reaching with a pick-up tool. I then pulled it into the trunk. My second cable did not want to come, so I attached it to the first with tape and then pulled both into the trunk.
Then I routed the cables out of the tunnel first into the place where the jack is stored. I routed them further below the carpet towards the CD changer, which I installed in the center indentation in the corner below the spare tire. To install the CD, you have to drill some holes: make sure you do not drill into the fuel tank, cables, pipes, etcetera. I coated the holes and screws with vaseline to reduce rust. I cut a small slit in the carpet to attach the cables to the CD.
Next, I needed to get at my radio, which requires that you take off the plastic center console. The first step is to get out the two center eyeball vents. To do so, I used a trick I learned from Jeff Anderson (from the radio fixes): take a piece of fairly thick rope (window cord) and fold the last three inches or so around. Put some tape around the fold to keep it fixed. Now you can easily loop the folded end of the rope through one of the holes in the eyeball vent and out another. Then you can pull the eyeball out by pulling the rope. (You may have to pull hard, within reason.) There is a screw hidden below each eyeball, and a third should be at the bottom left corner of the console. After removing these screws, you should be able to pull off the center console. The metal frame holding the radio can now be screwed out.
Now I needed to solder the auxiliary RCA jacks to my radio. Adam Seligman's instructions on miata.net describe this clearly. However, Adam Seligman uses a "header" to connect the RCA wiring to the DIN connector on the radio. I could not find a header anywhere in Tallahassee. Adam does give a reference to another method by Harry Sue, but I could not figure that one out either.
Instead I made my own connector. I used separate pins which I got from Radio Shack. First I soldered the wires to the pins as described by Adam Seligman, and checked them for mechanical sturdiness and electrical resistance using an ohm meter. Next I cut a small thin circle of cork and pushed the pins through this cork in the pattern of the DIN connector (which I had first transfered on a piece of paper). Then I pushed the pins in the right holes of the DIN plug and put a big blob of silicone sealer on top of the cork. I worked the sealer in between the pins using a small screwdriver and let it dry. I was very careful not to create shorts due to pieces of wire sticking out or due to pins or wires touching. The dried sealer between the pins should prevent the pins from shorting against each other, and it also adds a bit of strength to the soldered connections. Keep in mind that there is not that much clearance behind the radio.
Actually, I later discovered that you can order a 13 pin DIN plug from Digi-Key (http://www.digikey.com), part number CP-1013-ND and CUI stack part number SD-130 (there is a $5 processing fee for orders below $10). I ordered one and it looks like it should fit, but I do not want to take my finished setup apart to try. If you want to try it, I will send you my DIN plug *for free* as long as you tell me whether it fits the "3 big buttons" Miata radio correctly. Then I will note it here. Note however that the pins in a mini DIN plug are real close together; it might not be that easy to solder them. On the other hand, the final connector should be much more reliable than my cork-and-silicone setup.
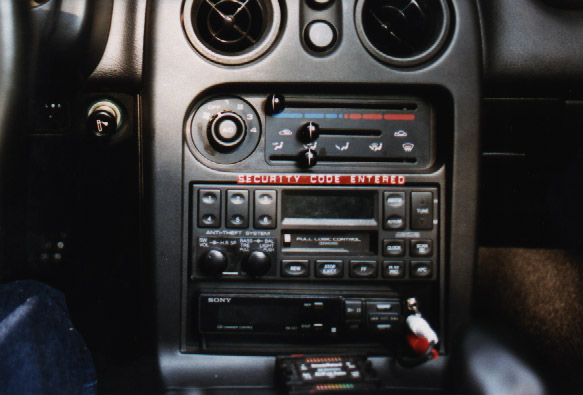
The next difficulty was where to put the RCA jacks and the wired remote control from the CD. In order that an unsuspecting mechanic does not start pulling on my delicate setup, I wanted the RCA connectors and the remote directly attached to the metal frame holding the radio. So I took out the little storage pocket below my radio and replaced it with a black plastic plate holding the RCA jacks and the remote. (I could have hidden the RCA jacks, but by leaving them accessible, I can easily hook up a portable CD player or any other line input.)
The plastic plate I got from the side of a floppy disk box: really nice strong and black plastic 1/8 inch thick. I cut out a piece measuring 7 1/2 by 2 3/8 inches by making grooves with a knife and breaking the plastic at the groves. I drilled three holes in it for the two RCA jacks and the DPDT switch that switches between CD and radio input (see Adam Seligman's instructions.) I put the holes at the side so that they are within the clearance in the center console and there was enough room left for the wired remote of the CD changer. However, I put the hole for the switch too close to one of the holes for the RCA jacks: the switch rests against the RCA cable in the off position. Oh, well.
To support the plastic plate I glued it to a piece of wood measuring 8 3/8 x 2 x 3/8 inches. Before glueing, I first made a cut-out in the wood to accomodate the cables to the RCA jacks and the switch. Then I glued the entire thing to the metal frame holding the radio. More silicone to strengthen the wire attachments at the RCA jacks and the switch.
I drilled holes through the wood to to allow the screws that attach the metal frame to the car to pass through. However, the standard screws are not long enough to pass through the wood. So I replaced them with longer 10 x 1 (yes, an English size, but it fit OK) metal screws.
I used an Ohm meter at its lowest setting to verify that all required connections were correct, and at its highest setting to verify that I did not have any shorts between different circuits. Next I put my plug into the DIN connector and screwed the radio frame back into the car.
The plastic center console had some hidden thin plastic ribs above the the two screws that bumped into the plastic plate; I used pliers to cut these ribs off. I also made some small indentations in the center console at the bottom of the plastic plate to allow the cable for the wired remote and the RCA cables to pass through.
However, the very first time I turned my ignition back on (with the switch in the CD position and the CD on), I busted the pre-amp in my radio. This cost me $60 for a new pre-amp plus $60 labor to get my power supply board rebuild!
Afterwards I have many times turned off my ignition without turning off the CD first, and I had no further problems. I also have many times turned on my ignition with the switch in the CD position and the CD on, also without problems. I wrote Adam Seligman, and he said he always simply turns his ignition on and off without turning off his CD (also a Sony changer), and he never burned out his radio. So maybe I had a weak pre-amp. Yet, I always try to remember to put the switch in the "radio" position before starting my engine: I feel little for another $120 charge (even though it is small compared to someone slashing your top to get at your premium aftermarket CD). I suggested to Adam Seligman that he might put up some warning in his web page description but he never did.
In any case, the CD changer puts clearly more power into the amplifier: I always have to turn the volume down when I switch to the CD. Despite these problems, I am pleased with the results.
A front view of the radio with the CD changer's wired remote
and the auxiliary inputs visible below it.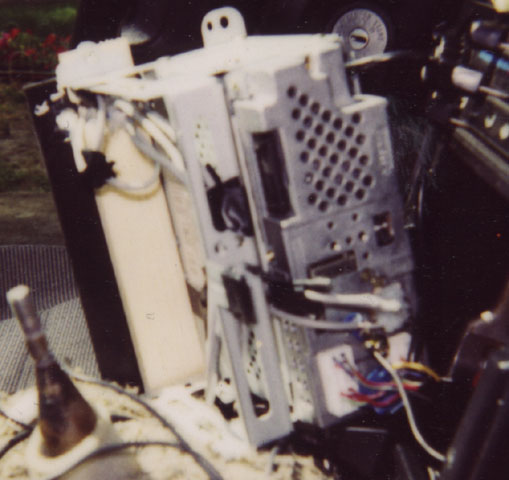 A rear view of the radio, with the silicon plug visible.